CityEngine中纹理贴图之道(二)
分享
-
2018-04-02
接着上一篇。
为了让脚本看起来更连贯,无需跳转上一篇,我们从头开始。
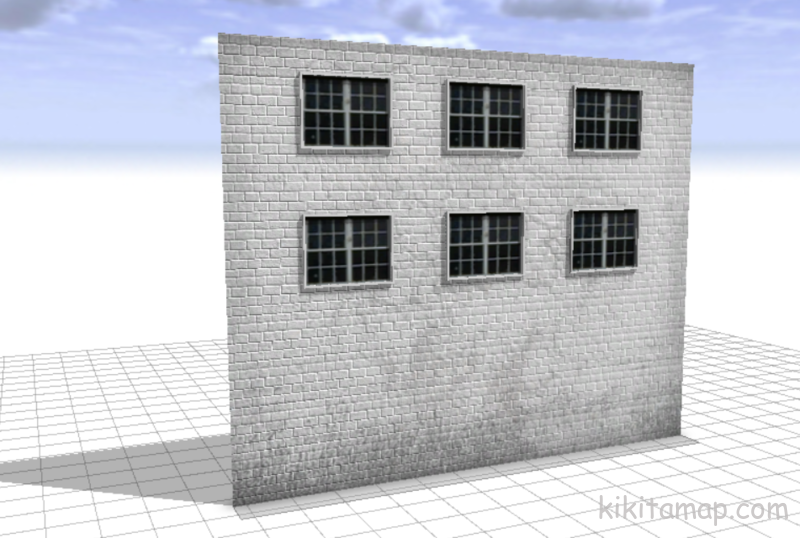
假设我希望在这面墙上“凿”出窗户,就需要将Sidefacade进行细化切割。贴纹理时也要注意一下新的技巧,也就是在细分表面之前先定义纹理UV,细分之后再用上一篇中提到的贴纹理的方法应用到Wall,这样就可以得到连续的墙体贴图。这样的做的原因在于,CE中的shape都是被不断迭代替换的,如果不在细分之前定义UV,Sidefacade对象在细分之后已经消亡了。
material.opacitymap
material.opacitymap 通道可以用于控制纹理的透明度。
继续上面的例子,如果希望做出透明的窗户效果,可以将Window的代码替换为如下的样子。
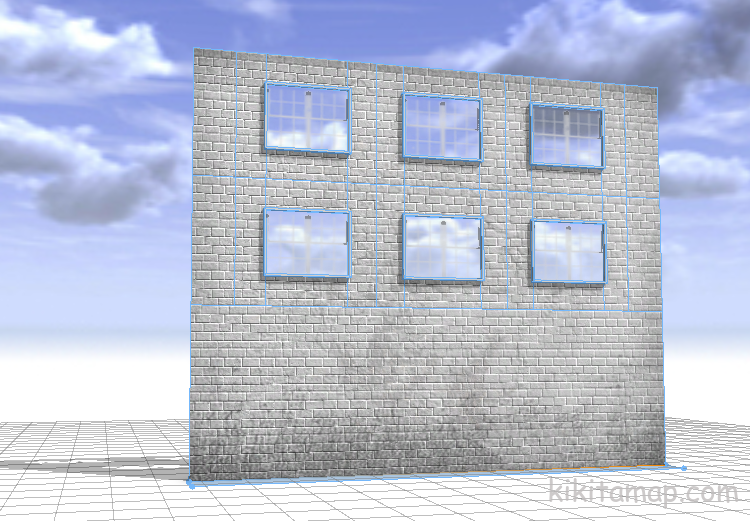
material.specularmap
为了虚拟现实,窗户玻璃来点反光效果吧。

上代码:
剩下最后的 normalmap了,法向贴图。手里没有什么好例子,找到一篇OpenGL的文档,帮助理解。
完结。
文章来源:http://kikitamap.com/2018/03/30/textureinCE2/
为了让脚本看起来更连贯,无需跳转上一篇,我们从头开始。
/**

 * File: MyTestforBaseTexure.cga

 * Created: 30 Mar 2018 08:16:37 GMT

 * Author: Xiaoyan Mu

 */


version "2017.1"

attr height = 10

attr groundfloor_height = 4

attr floor_height = 3.5

attr tile_width = 3.5


wall_tex        = "facades/textures/brickwall.jpg"

dirt_tex        = "facades/textures/dirtmap.15.tif"

graffiti_tex    = "facades/textures/Graffiti.jpg"

window_tex      = "facades/textures/window.5.tif"


Lot --> extrude(height) Building


Building --> comp(f) {front : Sidefacade} 假设我希望在这面墙上“凿”出窗户,就需要将Sidefacade进行细化切割。贴纹理时也要注意一下新的技巧,也就是在细分表面之前先定义纹理UV,细分之后再用上一篇中提到的贴纹理的方法应用到Wall,这样就可以得到连续的墙体贴图。这样的做的原因在于,CE中的shape都是被不断迭代替换的,如果不在细分之前定义UV,Sidefacade对象在细分之后已经消亡了。
# Sidefacade is modified


Sidefacade -->

    # Setup texturing

    setupProjection(1, scope.xy, 1.5, 1)

    setupProjection(2, scope.xy, scope.sx, scope.sy)

    # Divide Sidefacade

 	split(y){ groundfloor_height: Wall | {~floor_height : Floor}* }


Floor -->

	split(x){ 1 : Wall | { ~tile_width : Tile }* | 1 : Wall }

Tile -->

	split(x){ ~1 : Wall |  2 : split(y){ ~1: Wall | 1.5: Window | ~1: Wall } | ~1 : Wall }


Wall -->

    # Apply the texture

    set(material.bumpmap,wall_tex)

    set(material.dirtmap, dirt_tex)

    projectUV(1)

    projectUV(2)


Window -->

    offset(0.05)

    comp(f) { inside: WondowInner | border: WondowFrame }

    WondowInner -->

	  setupProjection(0, scope.xy, scope.sx,  scope.sy)

	  texture(window_tex)

	projectUV(0)

      WondowFrame -->

extrude(0.1)material.opacitymap
material.opacitymap 通道可以用于控制纹理的透明度。
继续上面的例子,如果希望做出透明的窗户效果,可以将Window的代码替换为如下的样子。
Window -->

    offset(0.05)

    comp(f) { inside: WondowInner | border: WondowFrame }

    WondowInner -->

      setupProjection(4, scope.xy, scope.sx,  scope.sy)

      set(material.opacitymap, window_tex)

      projectUV(4)

    WondowFrame -->

    extrude(0.1)
material.specularmap
为了虚拟现实,窗户玻璃来点反光效果吧。
上代码:
Window -->

    offset(0.05)

    comp(f) { inside: WondowInner | border: WondowFrame }

    WondowInner -->

	 setupProjection(0, scope.xy, scope.sx,  scope.sy)

	 texture(window_tex)

	 projectUV(0)

	 set(material.specular.r, 1)

     set(material.specular.g, 1)

     set(material.specular.b, 1)

	 set(material.shininess, 2)

	 setupProjection(3, scope.xy, scope.sx,  scope.sy)

	 set(material.specularmap, specular_tex)

	 projectUV(3)

    WondowFrame -->

    extrude(0.1)
剩下最后的 normalmap了,法向贴图。手里没有什么好例子,找到一篇OpenGL的文档,帮助理解。
完结。
文章来源:http://kikitamap.com/2018/03/30/textureinCE2/