在ArcGIS中创建Python工具(三)
分享
-
2015-12-04
从 ArcGIS 10.1 版本开始,我们可以创建 python工具箱 来自定义脚本工具,这种工具箱相比较上一篇提到的标准工具箱。有着独特的优势,具体二者的区别总结过,看这一篇。
认识 Python工具箱
Python 工具箱 (.pyt) 是一个简单的文本文件,可以在任何文本编辑器中或者任何 Python IDE 中创建、查看和编辑。要确保 ArcGIS 正确识别 Python 工具箱,工具箱类的名称必须是Toolbox。在Toolbox类的__init__方法中定义工具箱的属性,这些属性包括 alias、label 和 description,我们可以按照 帮助文档 中的模板构建 Python 工具箱模板。
如下代码中创建了包含一个工具(名为 Tool)的 Python 工具箱:
动手做做
下面我就依据这个模板,写一个简单的脚本工具箱。需求是批量裁剪,我希望我只提供一个文件夹或者数据库等这样的工作空间和一个裁剪区域面,就可以批量完成工作空间内全部数据的裁剪工作,并且无视栅格还是矢量,一并裁剪。
Let the scripting begin ……
1 创建工具箱
工具箱的name就是 .pyt 文件的名字,通常我们把工具添加到 ArcToolbox窗口中时会显示工具箱的 label。在
Toolbox类的__init__方法中定义属性,例如:
alias、label和description。
工具作为类被添加至 .pyt 中,工具箱的 tools 属性必须设置为包含定义的所有工具类的列表。比如,需要做ATool,ATool,CTool三个工具,不是写三个脚本,而是创建三个类,然后将类名放入列表,
self.tools = [ATool,ATool,CTool]。
这里,我仅定义一个工具类 ClipWorkspace,来说明构建过程即可 :
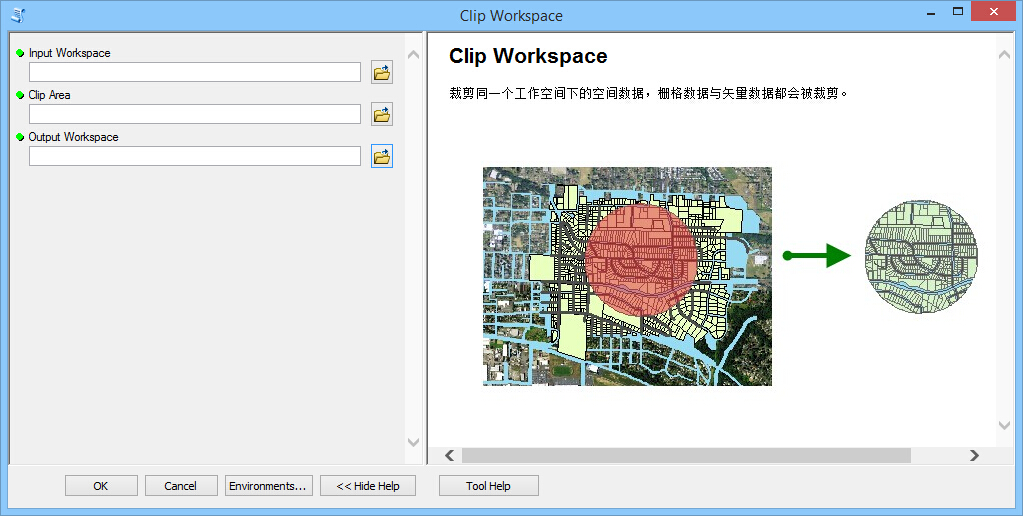
在 ArcGIS Desktop 中已经可以看到这个工具箱的雏形:

2 定义工具
下面就是完善工具内部的代码。我就以 ClipVectorWorkspace 为例。
每个工具类应至少包括__init__和execute方法。此外,还可以选择使用
getParameterInfo、isLicensed、updateParameters和updateMessages方法向工具的行为中添加其他控制。
工具类中的__init__方法是标准 Python 类初始化方法。对于 Python 工具箱中的工具,__init__方法用于设置该工具的属性,例如工具的标注、描述、是否允许在后台运行等。
下面的例子就创建了ClipVectorWorkspace这个工具:
有了工具的构造函数,我们继续看如何给工具定义参数。在 Python 工具箱 (.pyt) 中,可在工具类的getParameterInfo方法中创建Parameter
对象,并设置对象的属性来定义工具参数。
Parameter的属性中datatype包含的类型可以在帮助文档中查询,点这里。
此示例中的参数就是输入工作空间(inWorkspace)、裁剪区域面(ClipArea)、输出工作空间(outWorkspace)。
PS : 在代码中,如果仔细看,或许你会疑惑,为何输出工作空间的方向是 input ,而不是 output? 因为工具最终输出的为 Feature Class 或 Raster,输出工作空间也是作为输入参数传入工具使用的。如果不关心,也可以不在意这些细节…… 继续向下了解工具的构建过程。
下面就是工具的具体执行部分了,当然里面还加了些辅助了解工具执行状态的消息:
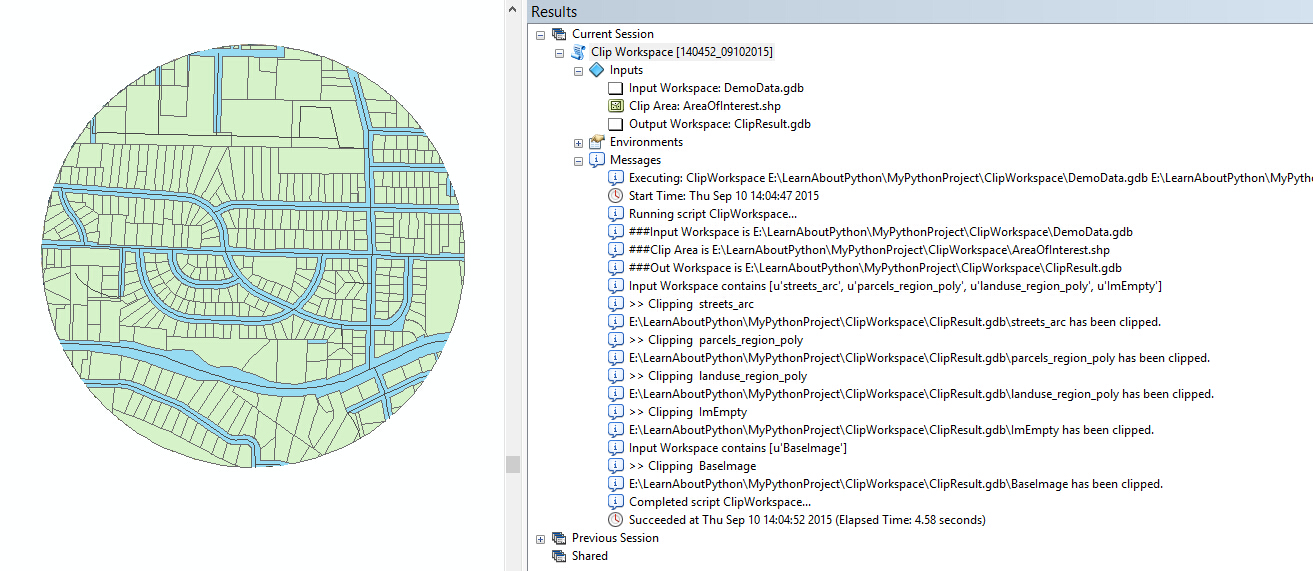
到这里,工具的核心部分已经完成,执行下试试。
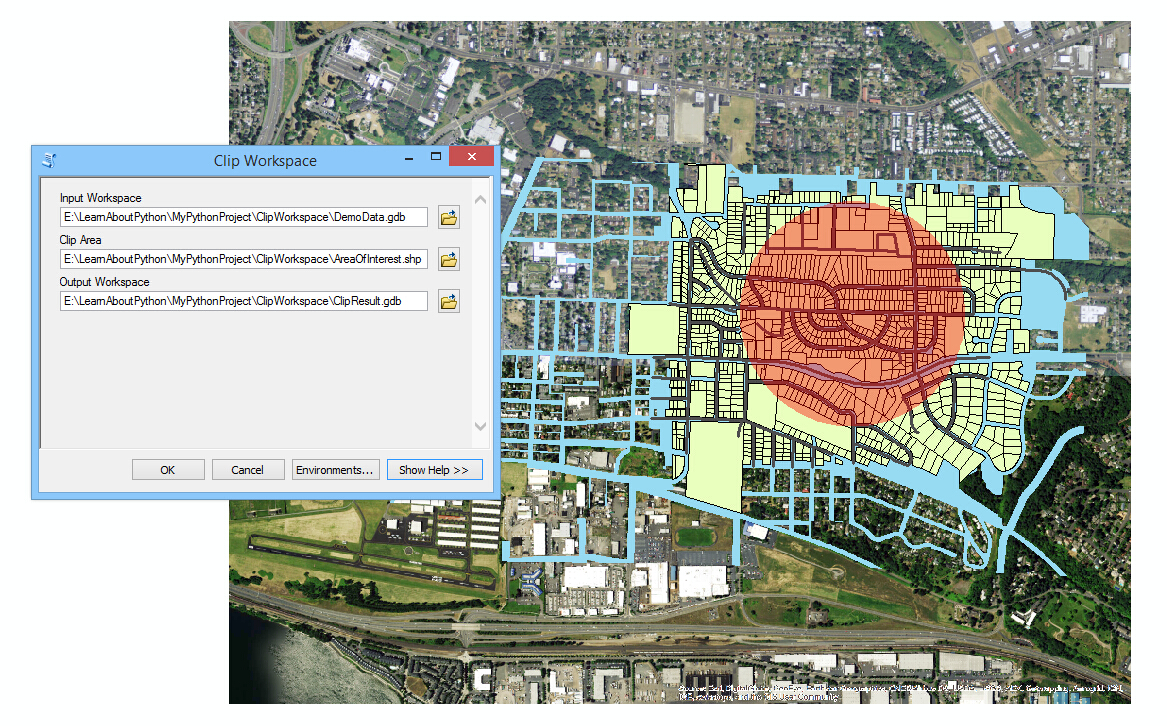
OK,应该是预期的结果:
3 完善
我们发现不像标准工具箱中的脚本工具和脚本文件本身是散列存储的,python工具箱以及其中的所有工具的代码都在这一个pyt文件中,维护起来便利了不少。如果想在工具箱中继续添加工具,只要继续增加一个工具类即可。
经过前两步的过程,工具已经可以拿去使用。如果为了工具更友好,还可以继续调整下代码,以便遇到异常的时候,让用户了解更详细的原因,这里就再往下进行了。工具分享给别人,最后只差要丰富下工具文档了,同样在 Python 工具的 Item Description 中编辑。
文章来源:http://kikitamap.com/2015/09/10/CreatePythonTool3/
认识 Python工具箱
Python 工具箱 (.pyt) 是一个简单的文本文件,可以在任何文本编辑器中或者任何 Python IDE 中创建、查看和编辑。要确保 ArcGIS 正确识别 Python 工具箱,工具箱类的名称必须是Toolbox。在Toolbox类的__init__方法中定义工具箱的属性,这些属性包括 alias、label 和 description,我们可以按照 帮助文档 中的模板构建 Python 工具箱模板。
如下代码中创建了包含一个工具(名为 Tool)的 Python 工具箱:
import arcpy


class Toolbox(object):

    def __init__(self):

        """Define the toolbox (the name of the toolbox is the name of the .pyt file)."""

        self.label = "Toolbox"

        self.alias = ""


        # List of tool classes associated with this toolbox

        self.tools = [Tool]


class Tool(object):

    def __init__(self):

        """Define the tool (tool name is the name of the class)."""

        self.label = "Tool"

        self.description = ""

        self.canRunInBackground = False


    def getParameterInfo(self):

        """Define parameter definitions"""

        params = None

        return params


    def isLicensed(self):

        """Set whether tool is licensed to execute."""

        return True


    def updateParameters(self, parameters):

        """Modify the values and properties of parameters before internal validation is performed. This method is called whenever a parameter has been changed."""

        return


    def updateMessages(self, parameters):

        """Modify the messages created by internal validation for each tool parameter. This method is called after internal validation."""

        return


    def execute(self, parameters, messages):

        """The source code of the tool."""

        return
动手做做
下面我就依据这个模板,写一个简单的脚本工具箱。需求是批量裁剪,我希望我只提供一个文件夹或者数据库等这样的工作空间和一个裁剪区域面,就可以批量完成工作空间内全部数据的裁剪工作,并且无视栅格还是矢量,一并裁剪。
Let the scripting begin ……
1 创建工具箱
工具箱的name就是 .pyt 文件的名字,通常我们把工具添加到 ArcToolbox窗口中时会显示工具箱的 label。在
Toolbox类的__init__方法中定义属性,例如:
alias、label和description。
工具作为类被添加至 .pyt 中,工具箱的 tools 属性必须设置为包含定义的所有工具类的列表。比如,需要做ATool,ATool,CTool三个工具,不是写三个脚本,而是创建三个类,然后将类名放入列表,
self.tools = [ATool,ATool,CTool]。
这里,我仅定义一个工具类 ClipWorkspace,来说明构建过程即可 :
''' Source Name: ClipWorkspace.pyt Author: Kikita Description: Python tool to clip spatial data in the same workspace by batch. '''


import arcpy


# The class name must be "Toolbox" ...

class Toolbox(object):

    def __init__(self):


        self.label = "Clip Workspace Toolbox"

        self.alias = ""


        # List of tool classes associated with this toolbox

        self.tools = [ClipWorkspace]


class ClipWorkspace(object):

    ……
在 ArcGIS Desktop 中已经可以看到这个工具箱的雏形:
2 定义工具
下面就是完善工具内部的代码。我就以 ClipVectorWorkspace 为例。
每个工具类应至少包括__init__和execute方法。此外,还可以选择使用
getParameterInfo、isLicensed、updateParameters和updateMessages方法向工具的行为中添加其他控制。
工具类中的__init__方法是标准 Python 类初始化方法。对于 Python 工具箱中的工具,__init__方法用于设置该工具的属性,例如工具的标注、描述、是否允许在后台运行等。
下面的例子就创建了ClipVectorWorkspace这个工具:
class ClipWorkspace(object):


    def __init__(self):

        self.label = "Clip Workspace"

        self.description = "clip spatial data in the same workspace by batch."

        self.canRunInBackground = True
有了工具的构造函数,我们继续看如何给工具定义参数。在 Python 工具箱 (.pyt) 中,可在工具类的getParameterInfo方法中创建Parameter
对象,并设置对象的属性来定义工具参数。
Parameter的属性中datatype包含的类型可以在帮助文档中查询,点这里。
此示例中的参数就是输入工作空间(inWorkspace)、裁剪区域面(ClipArea)、输出工作空间(outWorkspace)。
    def getParameterInfo(self):


        # Parameter Definitions

        # First parameter - Input Workspace

        param0 = arcpy.Parameter(

            displayName="Input Workspace",

            name="inWorkspace",

            datatype="DEWorkspace",

            parameterType="Required",

            direction="Input")


        # Second parameter - Clip Area

        param1 = arcpy.Parameter(

            displayName="Clip Area",

            name="CLipArea",

            datatype="DEFeatureClass",

            parameterType="Required",

            direction="Input")


        # Third parameter - Output Workspace

        param2 = arcpy.Parameter(

            displayName="Output Workspace",

            name="outWorkspace",

            datatype="DEWorkspace",

            parameterType="Required",

            direction="Input")


        params = [param0,param1,param2]

        return params
PS : 在代码中,如果仔细看,或许你会疑惑,为何输出工作空间的方向是 input ,而不是 output? 因为工具最终输出的为 Feature Class 或 Raster,输出工作空间也是作为输入参数传入工具使用的。如果不关心,也可以不在意这些细节…… 继续向下了解工具的构建过程。
下面就是工具的具体执行部分了,当然里面还加了些辅助了解工具执行状态的消息:
    def execute(self, parameters, messages):


        """The source code of the tool."""


        # Get tool parameters

        inWorkspace = parameters[0].valueAsText

        arcpy.AddMessage("###Input Workspace is {0}".format(inWorkspace))


        ClipArea = parameters[1].valueAsText

        arcpy.AddMessage("###Clip Area is {0}".format(ClipArea))


        outWorkspace =  parameters[2].valueAsText

        arcpy.AddMessage("###Out Workspace is {0}".format(outWorkspace))


        # Clip Feature by Batch

        arcpy.env.workspace = inWorkspace


        # Clip Vector

        FeatureClasses = arcpy.ListFeatureClasses()

        arcpy.AddMessage("Input Workspace contains {0}".format(FeatureClasses))

        for fc in FeatureClasses:

            arcpy.AddMessage(">> Clipping {0}".format(fc))

            arcpy.Clip_analysis(fc,ClipArea, os.path.join(outWorkspace,fc))

            arcpy.AddMessage("{0} has been clipped.".format(os.path.join(outWorkspace,fc)))


        # Clip Raster

        Rasters = arcpy.ListRasters()

        arcpy.AddMessage("Input Workspace contains {0}".format(Rasters))

        for Raster in Rasters:

            arcpy.AddMessage(">> Clipping {0}".format(Raster))

            arcpy.Clip_management(in_raster = Raster,

                                  rectangle = "",

                                  out_raster = os.path.join(outWorkspace,Raster),

                                  in_template_dataset = ClipArea,

                                  nodata_value = "",

                                  clipping_geometry = "ClippingGeometry",

                                  maintain_clipping_extent = "NO_MAINTAIN_EXTENT")

            arcpy.AddMessage("{0} has been clipped.".format(os.path.join(outWorkspace,Raster)))


        return
到这里,工具的核心部分已经完成,执行下试试。
OK,应该是预期的结果:
3 完善
我们发现不像标准工具箱中的脚本工具和脚本文件本身是散列存储的,python工具箱以及其中的所有工具的代码都在这一个pyt文件中,维护起来便利了不少。如果想在工具箱中继续添加工具,只要继续增加一个工具类即可。
经过前两步的过程,工具已经可以拿去使用。如果为了工具更友好,还可以继续调整下代码,以便遇到异常的时候,让用户了解更详细的原因,这里就再往下进行了。工具分享给别人,最后只差要丰富下工具文档了,同样在 Python 工具的 Item Description 中编辑。
文章来源:http://kikitamap.com/2015/09/10/CreatePythonTool3/
1 个评论
工具中必须用class类吗,直接def循环可以执行吗